
Learn How to Sync Audio With Video using simple steps for vlogs, podcasts, and films, fix delay fast, and make every project sound perfectly matched and pro.
Whether you’re working on a vlog, a podcast, or a short film, getting your audio perfectly in sync with your visuals can take your project from amateur to amazing. You’ll discover simple, effective ways to sync your audio with your video—no confusing jargon, just clear steps you can follow right away.
Ready to make your videos sound as good as they look? Let’s dive in!
Credit: support.apple.com
Tools For Syncing
Syncing audio with video needs the right tools. These tools help match sound and picture perfectly. Choosing the correct tools makes editing smoother and faster. Both software and hardware play key roles in syncing. Understanding what each offers helps pick the best solution for your needs.
Software Options
Many software programs can sync audio with video automatically. Adobe Premiere Pro is popular among professionals for its precise syncing features. DaVinci Resolve offers free, powerful tools for syncing audio and video clips. Final Cut Pro is another favorite for Mac users, known for ease of use. For beginners, tools like iMovie provide simple options to sync audio quickly. Some software uses waveform matching to align sound with video clips. Others use timecode to sync multiple cameras and microphones perfectly.
Hardware Requirements
Good hardware supports smooth syncing and editing. A fast computer with enough RAM helps run syncing software without lag. High-quality audio recorders capture clean sound, making syncing easier. Cameras with built-in timecode generators improve sync accuracy. Using an external microphone often gives better audio than the camera’s built-in mic. A clapperboard or slate can help mark sync points during recording. Proper cables and connectors ensure clear audio signals for syncing.
.png)
Credit: riverside.com
Preparing Your Files
Preparing your files is the first step to syncing audio with video. Proper preparation helps avoid delays and confusion later. Organizing and checking your files saves time during editing. It ensures smooth workflow and better results.
Organizing Audio And Video
Start by placing all audio and video files in one folder. Name your files clearly using simple labels. For example, use “Scene1_Audio” or “Scene1_Video.” This makes it easier to identify files quickly.
Sort your files by date or scene number. Keep backup copies on a separate drive or cloud storage. This protects your work against loss or corruption. Keep your workspace tidy to avoid mixing files.
Checking File Formats
Check that your audio and video use compatible formats. Common video formats include MP4, MOV, and AVI. Audio files often come as WAV, MP3, or AAC. Use formats supported by your editing software.
Convert files if necessary using free tools like HandBrake or Audacity. Maintain high-quality audio and video to avoid sync issues. Confirm the frame rate and sample rate match between files. Matching rates help keep audio and video aligned.
Manual Sync Techniques
Manual sync techniques help align audio with video without relying on automatic tools. These methods give you control over timing and precision. They work well for simple projects or when software fails to sync correctly.
Manual syncing involves careful listening and visual checking. It may take more time but ensures accuracy. Two common ways to do this are using waveforms and setting markers.
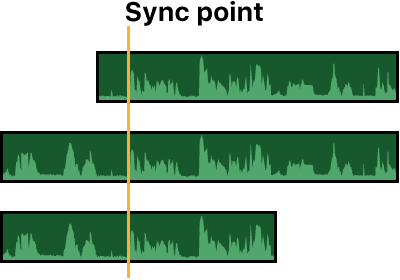
Using Waveforms
Waveforms show the audio signal visually. Peaks and valleys represent loud and quiet parts. You can match these patterns to the video’s action or dialogue.
Zoom into the timeline to see detailed waveforms. Look for sharp sounds, like claps or slaps, that stand out. Align these with the exact moment in the video.
This method works best with clear, distinct sounds. It helps fix small delays and improves sync accuracy.
Setting Markers
Markers are points you place on the timeline to mark key events. They act as guides for syncing audio and video.
Play the video and listen carefully. Set a marker at a noticeable sound or action. Do the same on the audio track.
Then, move the audio or video so that the markers line up perfectly. This technique helps keep sync steady across long clips.
Automatic Sync Methods
Automatic sync methods save time and effort during video editing. These techniques align audio and video clips without manual adjustment. They rely on specific data or patterns found in the files. Using automatic syncing helps maintain perfect timing and smooth playback. Below are two common automatic sync methods used by editors.
Timecode Syncing
Timecode syncing uses a timestamp recorded on both audio and video devices. This timestamp acts like a clock, marking exact moments in the recording. Editing software reads these timecodes to match audio and video precisely. This method is highly accurate and efficient for multi-camera shoots. It reduces errors and speeds up the editing process. Timecode syncing requires devices to have synchronized clocks during recording.
Audio Waveform Syncing
Audio waveform syncing compares the sound waves in audio and video tracks. The software detects peaks and patterns to find matching points. It then aligns the clips based on these audio similarities. This method works well when timecodes are unavailable. Editors often use it for interviews or single-camera setups. Waveform syncing can handle slight differences in audio quality. It provides a fast and reliable way to sync clips automatically.
Syncing In Popular Editors
Syncing audio with video is a crucial step in video editing. It ensures that the sound matches the visuals perfectly. Popular video editors provide different tools and methods to make this process easier. Understanding how each editor handles syncing can save time and improve your final video quality.
Most editors offer both manual and automatic syncing options. Some use waveform matching, while others rely on timecode or markers. Choosing the right method depends on your footage and audio files. Below are tips for syncing audio and video in three popular editors.
Premiere Pro Tips
Premiere Pro has a built-in feature called “Merge Clips” for syncing. Select your video and audio clips, right-click, then choose “Merge Clips.” Use the audio waveform option to sync automatically. It compares the audio in both clips and aligns them perfectly.
For multiple clips, use the “Synchronize” feature in the timeline. Select clips, right-click, and pick “Synchronize.” Choose “Audio” as the sync point. Premiere will match the waveforms and align the clips.
Manually adjust sync by zooming into the timeline. Drag clips frame-by-frame to fix small mismatches. Use the audio meters to check if the sound matches the video action.
Davinci Resolve Tricks
DaVinci Resolve offers an auto-sync option with waveform and timecode. Import your clips and select them in the media pool. Right-click and choose “Auto Sync Audio” then pick your sync method. Waveform sync works best for files without timecode.
Use the “Sync Bin” to organize synced clips easily. This feature helps keep your timeline clean and efficient. You can also sync multiple clips at once, saving time on big projects.
Manual syncing is simple too. Zoom into the timeline and align audio waveforms with video actions. Use the audio mixer to fine-tune levels and balance.
Imovie And Shotcut
iMovie is beginner-friendly and allows manual syncing only. Drag your audio under the video clip in the timeline. Look for visual cues like lip movements or actions to match with sound.
Use the waveform display to help line up audio with video. Play and pause frequently to check sync accuracy. Small adjustments can make a big difference.
Shotcut supports automatic syncing through waveform matching. Select both clips, then right-click and choose “Synchronize.” The program aligns audio peaks with the video track.
Manual syncing is available by zooming into the timeline and dragging clips. Both editors provide simple tools ideal for quick edits or beginners.
Fixing Common Issues
Syncing audio with video can sometimes cause issues that interrupt the viewing experience. Common problems include audio delay and frame rate mismatches. Fixing these issues is essential for clear, professional-quality content.
Understanding the causes and solutions helps you correct sync problems quickly. Simple fixes often improve the overall quality without complicated tools.
Audio Delay Solutions
Audio delay happens when sound plays too early or too late compared to the video. It can distract viewers and ruin the flow of content.
One way to fix audio delay is by adjusting the audio track timing. Most video editors allow you to move the audio forward or backward in small steps. Check the waveform to match sound with the correct video action.
Sometimes, restarting the editing software or device can clear temporary glitches causing delays. Also, try using a different media player to confirm if the delay is within the file or software.
Handling Mismatched Frame Rates
Frame rate mismatches occur when the video and audio were recorded at different speeds. This causes the audio to drift out of sync over time.
Convert both audio and video to the same frame rate before syncing. Use video editing software to change the frame rate of the video or audio clip.
Consistent frame rates ensure the audio stays aligned with the video throughout the entire clip. This step is crucial when combining footage from different sources.
Enhancing Sync Accuracy
Enhancing sync accuracy is key to creating smooth, professional videos. Poor sync distracts viewers and lowers content quality. Small timing errors can make audio feel off or out of place. Improving sync accuracy ensures audio matches video perfectly. This section explains practical steps to boost sync precision.
Using Beat Markers
Beat markers help find exact points in audio for syncing. Most editing tools show beat markers on the audio waveform. These markers represent strong beats or rhythm points in music or sound. Align video clips or audio segments to these markers. This makes syncing faster and more accurate. Beat markers are especially useful for music videos and dance scenes. They give clear visual cues to match timing perfectly.
Fine-tuning With Markers
After rough syncing, use markers to fine-tune timing. Place manual markers on key video frames or audio spikes. These markers act as guides for small adjustments. Zoom in on the timeline to move clips frame by frame. Check lip-sync or sound effects timing carefully. Adjust clip positions slightly until audio matches video precisely. Fine-tuning with markers helps fix small sync errors that beat markers may miss. This step improves overall sync quality and viewer experience.

Credit: www.youtube.com
Exporting And Sharing
Exporting and sharing your synced audio and video is the last step in your editing process. It ensures your work looks and sounds great on any device. Proper export settings keep the audio and video perfectly aligned. Sharing options let you deliver your project easily to clients or audiences.
Final Checks
Before exporting, review your project carefully. Play the entire video and listen for any audio misalignments. Check that all clips are trimmed correctly. Confirm the audio levels are balanced and clear. Make sure there are no unwanted noises or glitches. Fix any issues before moving to export. A smooth playback means a better final product.
Best Export Settings
Choose the right format for your video. MP4 is widely supported and good for online sharing. Use H.264 codec for high quality with small file size. Set the frame rate to match your original footage. Export audio in AAC format at 320 kbps for clear sound. Keep the resolution the same as your project to avoid quality loss. Use two-pass encoding for better compression and quality. Save your file with a clear, descriptive name to find it easily later.
Raed More : InVideo AI Reviews: Best AI Video Creator for Marketers & Creators
Frequently Asked Questions
How Do I Sync My Audio And Video?
To sync audio and video, align their waveforms using editing software like Premiere Pro or DaVinci Resolve. Use timecode or manual markers for accuracy. Drag clips to match audio beats, then fine-tune timing. Preview to ensure perfect sync before exporting your project.
How Do I Fix Audio Delay In Video?
Fix audio delay by adjusting the audio track timing in your video editor. Use syncing tools like timecode or waveform matching. Restart the video or try another player if delay persists. Ensure your audio and video files are properly aligned before exporting.
How To Blend Audio And Video?
Upload your audio and video files to editing software. Align audio waveform with video timeline. Trim and adjust to sync perfectly. Preview the blend, then export the final file.
How To Lip Sync A Video With Audio?
To lip sync a video with audio, align the audio waveform with the video’s mouth movements using editing software. Use markers or auto-sync features for precise timing. Preview and adjust until the audio matches the lip movements perfectly. Export the synced video for sharing or publishing.
Conclusion
Syncing audio with video improves the viewer’s experience greatly. Start by aligning the audio waveform with the video’s visual cues. Use simple tools to adjust timing and fix delays quickly. Practice makes this process easier and faster over time. Clear sound and sharp video keep your audience engaged.
Keep your edits clean and check the final result carefully. Good syncing helps your content look professional and polished. Try these tips on your next project to see the difference.

