WordPress on Hostinger: Ultimate Guide to Easy Setup
Founder & Lead SaaS Analyst at PCSaaS · Google Ads & Analytics Certified · SaaS Stack Architect · 500+ Software Tools Tested · 8+ years in B2B SaaS evaluation, AppSumo lifetime deal curation, performance marketing, and AI workflow automation
WordPress on Hostinger is a powerful combination. It offers ease and reliability.
Many users choose Hostinger to host their WordPress sites because of its affordability and performance. WordPress, a popular content management system, is trusted by millions. Hostinger, known for its user-friendly hosting services, makes managing WordPress sites simple. Together, they create a seamless experience for website owners, from beginners to experts.
Hostinger's platform is optimized for WordPress, ensuring fast load times and minimal downtime. This combination also provides robust security features, keeping your site safe from threats. Whether you are starting a blog, an online store, or a portfolio, WordPress on Hostinger is a choice worth considering. In the following sections, we will explore the benefits and steps to get started with WordPress on Hostinger.
This guide has been refreshed for 2026, covering the latest Hostinger tools and best practices for WordPress users. If you are evaluating hosting options, you can also compare Hostinger with other budget-friendly shared environments to see which fits your needs.
Introduction To WordPress And Hostinger
WordPress is a popular choice for website creation. Hostinger offers a reliable platform for hosting your WordPress site. This combination provides a seamless and efficient experience for users.
What Is WordPress?
WordPress is a content management system (CMS). It allows users to build websites and blogs. Over 40% of websites use WordPress. It is user-friendly and flexible. You can create any type of website with WordPress. It has thousands of themes and plugins. These help to customize your site to your needs.
The official WordPress project maintains the core software, and its open‑source ecosystem means you can extend your site with everything from e‑commerce plugins to membership systems. When you pair WordPress with Hostinger, you benefit from one‑click updates and server‑side caching that keeps the CMS running smoothly.
In practice, WordPress has evolved significantly over the years. The 2026 version includes a much-improved Site Editor (full site editing) that lets you modify headers, footers, and templates directly from the interface without touching code. This makes Hostinger's one-click installation even more valuable because you get immediate access to these modern editing capabilities.
Why Choose Hostinger?
Hostinger is a web hosting provider. It offers affordable plans and excellent performance. Hostinger's servers are fast and reliable. They ensure your WordPress site runs smoothly. Hostinger also provides a user-friendly control panel. This makes managing your website easy.
Hostinger offers 24/7 customer support. Their team is knowledgeable and helpful. They can assist with any issues you may face. Hostinger's plans include free SSL certificates. This helps to secure your website and build trust with visitors.
Hostinger and WordPress make a great pair. They provide a solid foundation for your online presence.
In practice, many website owners appreciate Hostinger's LiteSpeed caching and custom WordPress optimization, which can reduce page load times significantly. For those needing a dedicated setup for content‑driven sites, exploring dedicated blog hosting options can help you choose the right tier.
A lesser-known advantage of Hostinger is its custom control panel, hPanel, which is designed specifically for WordPress users. Unlike traditional cPanel, hPanel includes WordPress-specific shortcuts for staging, caching, and auto-installation that save you several clicks during routine maintenance.
The Hostinger hPanel dashboard showing quick-access tools for managing your WordPress installation.
Credit: m.youtube.com
Preparing For Installation
Preparing to install WordPress on Hostinger involves some essential steps. Each step ensures a smooth setup process. This guide will help you get ready.
Choosing A Hosting Plan
First, select the right hosting plan on Hostinger. They offer different options. Shared Hosting is good for beginners. It is affordable and easy to use. For larger sites, choose VPS Hosting. It provides more resources and control. Evaluate your needs and budget. This helps you make the best choice.
A common mistake is picking a plan that is too small and hitting resource limits as your site grows. If you anticipate medium traffic, consider a cloud shared hosting plan that scales more flexibly. Hostinger also offers dedicated WordPress plans that include pre‑configured caching and staging environments.
When comparing plans, pay attention to the number of websites allowed — Hostinger's entry-level plan typically covers one website, while higher tiers let you host multiple projects. This matters if you run separate sites for testing or side businesses. If you need flexibility with billing, the best monthly hosting plan options from Hostinger let you avoid long-term commitments while still getting solid performance.
Registering A Domain Name
Next, you need a domain name. This is your website's address. Choose a name that is easy to remember. It should reflect your brand or topic. Check for availability on Hostinger. If your first choice is taken, try variations. Avoid long or complex names. Simple names are easier to type and remember. Register your domain directly through Hostinger. This keeps everything in one place.
Don't forget to enable domain privacy protection (often included for free with Hostinger) to keep your personal contact details hidden from public WHOIS lookups. You can manage your domain alongside your hosting through the Hostinger domain hosting dashboard, which simplifies renewal and DNS management.
A practical tip: choose a .com extension if possible — it remains the most recognized and trusted top-level domain for businesses and blogs. If your desired .com is taken, Hostinger's domain search tool suggests alternative extensions like .net, .org, or .co that are still professional.
Setting Up Your Hosting Account
Starting your WordPress journey begins with setting up your hosting account. Hostinger offers a user-friendly platform that makes this process smooth. Follow these steps to get your website up and running in no time.
Creating A Hostinger Account
First, you need to create your Hostinger account. Visit the Hostinger website and click on the "Get Started" button. You will be directed to a sign-up page.
Here's a quick guide:
Enter your email address.
Choose a strong password.
Click on the "Sign Up" button.
After signing up, you will receive a verification email. Open the email and click on the verification link. Your account is now ready.
Once verified, you can immediately log in and purchase a plan. Hostinger often offers introductory discounts, so it's worth checking reliable hosting plan deals before committing. After payment, you'll land in the hPanel, where you can start configuring your WordPress site.
During the account creation process, make sure to use a real email address you check regularly — Hostinger sends important notices about billing, security updates, and free domain renewals there. If you lose access to that email, you could miss critical account alerts.
Navigating The Control Panel
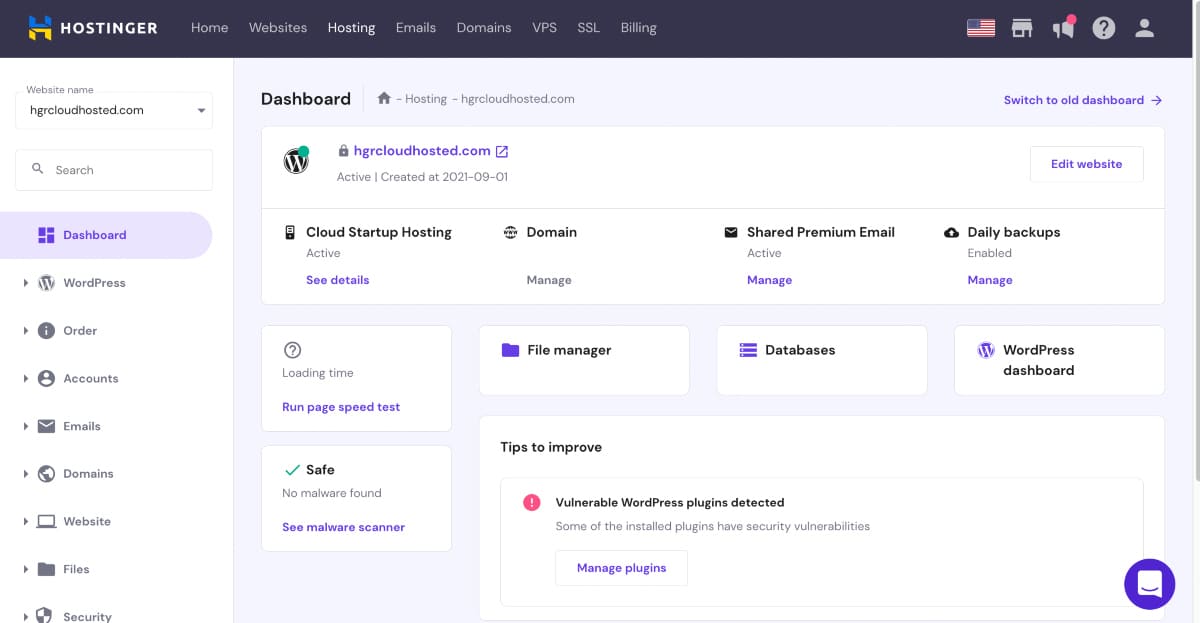
Once your account is set up, log in to the Hostinger control panel. This panel is your website's command center. You can manage your hosting settings, install WordPress, and more.
Here's a breakdown of the main sections:
| Section | Function |
|---|---|
| Dashboard | Overview of your account and quick access to essential tools. |
| Hosting | Manage your hosting plans, domains, and backups. |
| Emails | Set up and manage your email accounts. |
| Domains | Manage your domains and DNS settings. |
| Website | Access website builders, auto installers, and other tools. |
To install WordPress, navigate to the "Website" section. Click on "Auto Installer" and select WordPress. Follow the on-screen instructions to complete the installation.
Your WordPress site will be live in minutes. Hostinger's control panel makes managing your site easy and efficient.
For beginners, the hPanel also provides a quick link to phpMyAdmin for database management and a file manager for uploading custom files. Familiarizing yourself with these tools will make troubleshooting and customizing your site much simpler later on.
A pro tip: bookmark the hPanel login page in your browser so you can access it quickly. Many users waste time searching for the login URL each time they need to check backups or renew their SSL certificate.
 Comparing Hostinger's WordPress plan tiers to find the right fit for your traffic needs.
Credit: bloggerspassion.com
Installing WordPress
Installing WordPress on Hostinger is a straightforward process. Whether you choose the quick one-click installation or prefer doing it manually, this guide will walk you through both methods.
One-click WordPress Installation
Hostinger offers an easy one-click WordPress installation. Start by logging into your Hostinger account. Navigate to the control panel. Find the "Website" section and click on "Auto Installer."
Select "WordPress" from the list of applications. Fill in the necessary details, such as your website name and admin credentials. Click on the "Install" button. The installation process will begin and finish within minutes. Your WordPress site is now ready to use.
For best results, choose a strong admin username and a secure password. Hostinger's one‑click method also automatically sets up the correct database credentials, saving you from potential configuration errors.
One thing many users overlook: during the one-click setup, Hostinger asks if you want to install a pre-built theme or start with a blank site. For beginners, picking a pre-built demo can save days of design work. For experienced users, starting blank gives more creative freedom.
Manual WordPress Installation
Prefer a hands-on approach? Here's how to manually install WordPress on Hostinger. First, download the latest WordPress package from the official WordPress website. Extract the downloaded files.
Next, log into your Hostinger control panel. Go to the "Files" section and open the "File Manager." Upload the extracted WordPress files to your public_html directory. Create a new MySQL database and user for WordPress. Remember to note down the database details.
Open your web browser and enter your domain name. You will be greeted by the WordPress setup wizard. Choose your preferred language and click "Continue." Enter your database details and click "Submit."
Run the installation by clicking "Run the Install." Fill in your site title, username, password, and email. Click "Install WordPress." Your manual WordPress installation is now complete. Enjoy your new WordPress site.
If you run into file permission errors during manual installation, set the wp‑content folder to 755 and all other files to 644 via the file manager. This is a common fix that keeps your site secure while allowing WordPress to write uploaded files.
The manual method is more educational — it helps you understand how WordPress connects to a database and how files are organized on the server. Even if you use the one-click method initially, going through a manual install once will make you a more confident site owner.
https://www.youtube.com/watch?v=-NfPsVz-YB8
Configuring Your WordPress Site
Setting up your WordPress site on Hostinger is an exciting journey. With WordPress, you can build a professional website with ease. To ensure your site functions smoothly, follow these steps for configuration.
Initial Setup And Settings
First, log in to your WordPress dashboard. This is where you will manage your site.
Go to Settings in the sidebar. Here, you will find several options:
General: Set your site title and tagline. Adjust the URL if needed.
Writing: Configure your default post category and format.
Reading: Set your homepage display. Choose between latest posts or a static page.
Discussion: Manage your comments settings.
Media: Define image sizes.
Permalinks: Choose your URL structure. "Post name" is SEO-friendly.
One tip: set your timezone to match your local region so that scheduled posts publish at the correct hour. Also, under Permalinks, selecting "Post name" improves readability and search engine ranking. For additional guidance, many site owners refer to budget‑friendly blog hosting advice when configuring their new setup.
Another critical setting many beginners skip: the "Search Engine Visibility" checkbox under Reading settings. Keep it unchecked so search engines can index your site. Accidentally checking this box blocks your site from appearing in Google results — a common mistake when testing during setup.
Selecting And Installing Themes
Choosing the right theme is crucial. It affects your site's appearance and performance.
Navigate to Appearance > Themes in the dashboard. Click on Add New to explore available themes.
Use the search bar to find themes that match your style. Preview a theme to see how it looks.
To install a theme:
Click Install on your chosen theme.
Once installed, click Activate .
Customize your theme by going to Appearance > Customize . Here, you can modify colors, fonts, and layouts.
Consider using a child theme if you plan to make significant changes. This keeps your customizations safe during updates.
Explore themes from the WordPress repository or premium marketplaces. Ensure the theme is responsive and SEO-friendly.
A popular premium option is OceanWP, which offers deep customization and fast performance. You can read our OceanWP Pro review to see if it suits your project. It integrates seamlessly with Hostinger's caching layer.
When evaluating themes, check their update frequency and support status. A theme that hasn't been updated in over a year may have security vulnerabilities or compatibility issues with newer WordPress versions. Active themes with regular updates are safer and perform better.
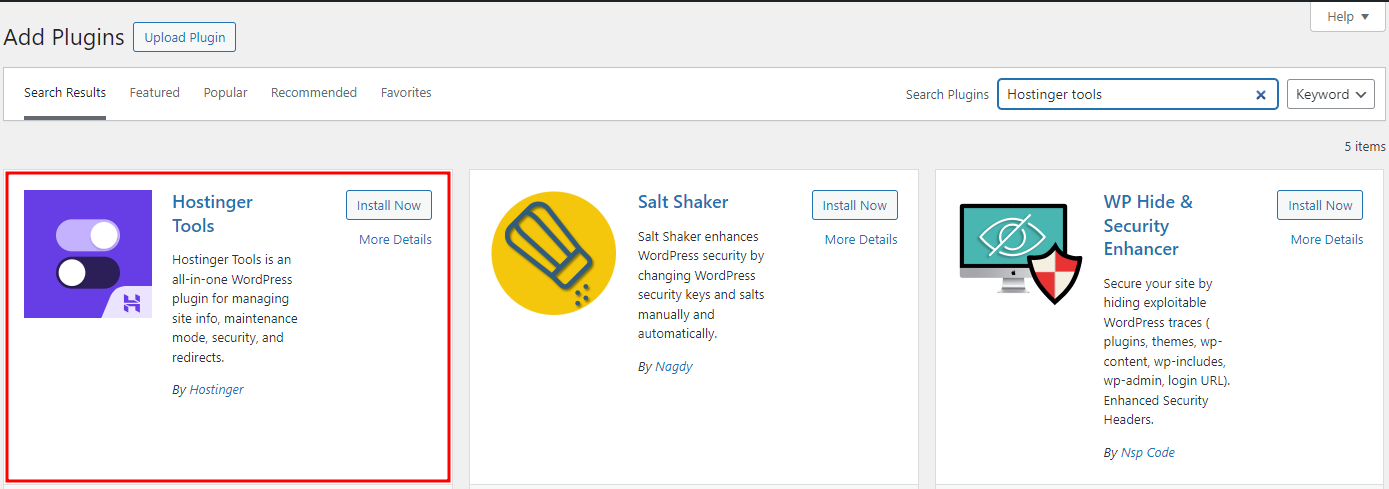 Using the Hostinger tools repository to install WordPress and optional pre-configured themes.
Credit: www.hostinger.com
Essential Plugins To Install
WordPress on Hostinger is a powerful combination. But, to get the most out of your website, you need the right plugins. Plugins add features and improve your site's performance. Let's explore some essential plugins you should install.
Seo Plugins
SEO plugins help your site rank better on search engines. Yoast SEO is a popular choice. It offers real-time content analysis. It also provides suggestions to improve your SEO. Another good plugin is All in One SEO Pack. It is easy to use and very effective.
Beyond these, consider installing a schema markup plugin like Rank Math to add structured data easily. Ensure that whichever SEO plugin you choose, you only keep one active—running multiple can cause conflicts.
A practical workflow for SEO: install your chosen plugin first, then run its setup wizard. This typically asks about your site type (blog, business, e-commerce) and automatically configures basic settings. You can then fine-tune specific pages as you create content.
Security Plugins
Security is crucial for any website. Wordfence Security is a top pick. It provides a firewall and malware scan. It keeps your site safe from threats. Another solid choice is Sucuri Security. It offers monitoring, malware scanning, and security notifications.
A practical habit is to enable two‑factor authentication (2FA) through Wordfence or a dedicated 2FA plugin. Hostinger's own security layer (Bitninja) already blocks many attacks, but a security plugin adds an extra line of defense for login pages and comment forms.
Another smart security measure: change the default "admin" username during installation. If your site already has an admin user named "admin," create a new user with administrator privileges and delete the old one. Attackers often try "admin" as the first guess in brute-force login attempts.
Performance Plugins
Performance plugins make your site faster. WP Super Cache is one such plugin. It generates static HTML files for your site. This reduces load time. Another great option is W3 Total Cache. It improves server performance and reduces download times.
Note that Hostinger already uses LiteSpeed Cache server‑side. If you are on a Hostinger plan with LiteSpeed, you can install the LiteSpeed Cache plugin instead—it works more efficiently with the server and includes image optimization and CSS/JS minification.
For image optimization specifically, consider adding a dedicated plugin like Smush or ShortPixel. Large, unoptimized images are one of the biggest drags on page speed. These plugins can compress your existing image library and automatically optimize new uploads.
Customizing Your Website
Customizing your website on Hostinger's WordPress is easy and flexible. You can create a unique look and feel for your site. With a few clicks, you can change themes, add pages, and create posts. Let's explore some key ways to customize your website using WordPress on Hostinger.
Using The WordPress Customizer
The WordPress Customizer is a powerful tool. It allows you to make changes to your site in real-time. Access it from your WordPress dashboard. Click on "Appearance" and then "Customize." Here, you can change your site's title, tagline, and logo. You can also adjust colors, fonts, and layouts. It's user-friendly and does not require coding skills.
For deeper customization, many themes also offer additional panels inside the Customizer for widgets, menus, and homepage sections. Experiment with different header and footer layouts to see what best represents your brand.
One feature in the Customizer that often goes unused is the "Additional CSS" panel. This lets you add small style tweaks — like changing a button color or adjusting spacing — without modifying your theme files. Changes made here persist even after theme updates.
Adding Pages And Posts
Adding pages and posts is essential for your website. Pages are static and great for content like "About Us" or "Contact." Posts are dynamic and ideal for blog entries. To add a page, go to your dashboard. Click on "Pages" and then "Add New." Enter your content and click "Publish."
To add a post, click on "Posts" and then "Add New." Write your content and choose a category. Click "Publish" when you're ready. Regular updates keep your site fresh and engaging. It's important to provide valuable content for your visitors.
Organize your posts using categories and tags to help visitors and search engines navigate your content. A good practice is to create around five to ten broad categories and use tags for specific topics within them.
When writing posts, use the WordPress block editor (Gutenberg) to create richer layouts. You can add columns, image galleries, buttons, and embedded videos without any HTML knowledge. The block editor is now the standard editor for WordPress and works especially well with Hostinger's fast server response times.
Maintaining Your WordPress Site
Maintaining your WordPress site is essential for its performance and security. Regular maintenance ensures your site runs smoothly and remains secure from threats. Here are some crucial steps to help you maintain your WordPress site on Hostinger.
Regular Backups
Regular backups are vital for your WordPress site. They protect your data from unexpected issues. Use backup plugins like UpdraftPlus or BackWPup. Schedule backups weekly or daily, depending on your site's activity. Store backups in multiple locations. For example, on your computer and cloud storage. This way, you can restore your site quickly if needed.
Hostinger also provides an automatic daily backup feature on some plans—check your hPanel under Backups to enable it. Having both a plugin backup and the host‑level backup gives you an extra safety net.
Before performing any major update — such as changing themes, updating a critical plugin, or editing PHP files — manually create a fresh backup. This takes only a few minutes and can save hours of recovery time if something goes wrong.
Updating WordPress Core, Themes, And Plugins
Keep your WordPress core updated. Updates improve security and performance. Hostinger notifies you of new updates. Update themes and plugins regularly. Outdated themes and plugins can cause conflicts. They can also expose your site to security risks. Always test updates on a staging site first. This prevents issues on your live site.
If your Hostinger plan includes a staging tool (available on Business and Cloud plans), use it to test major updates before deploying. This feature is particularly helpful when running a small website where downtime can hurt visitor trust.
Set aside 15 minutes each week specifically for maintenance. Log in, check for pending updates, review your security logs, and verify that backups ran successfully. This routine prevents small issues from becoming emergencies.
Troubleshooting Common Issues
WordPress is a powerful platform, but users may face issues. Common problems can arise, causing frustration. This guide will help you solve these problems on Hostinger.
Common Installation Errors
Installation errors are frequent. The most common is the "Error establishing a database connection." This happens due to incorrect database details. Double-check the database name, username, and password. Also, ensure the database server is correct.
Another error is the "White Screen of Death." This means a PHP error or memory limit issue. Increase your PHP memory limit in the wp-config.php file. If that doesn't work, disable your plugins. Reactivate them one by one to find the problematic plugin.
Another frequent issue after moving a site is "too many redirects." Clear your browser cache and check your WordPress Address and Site Address in Settings > General—they must match exactly. If you use Cloudflare, temporarily pause it to see if the redirect loop resolves.
For any error you encounter, Hostinger's support team can check server-side logs (like error_log files) to pinpoint the exact cause. Provide them with the error message and the steps you've already tried — this speeds up the troubleshooting process significantly.
Fixing Performance Issues
Slow websites drive users away. Common causes of slow performance include large images and too many plugins. Optimize images using plugins like Smush. Limit the number of active plugins to essential ones only.
Another issue is server performance. Hostinger offers a caching feature. Enable it to speed up your website. Also, consider using a content delivery network (CDN). This helps by distributing your content globally.
Leverage Hostinger's built‑in CDN (powered by Cloudflare) by enabling it from the hPanel. Combine that with image lazy loading and a lightweight theme to further improve load times. For e‑commerce or membership sites, a business‑class hosting package with dedicated resources can prevent slowdowns during traffic spikes.
A quick performance test: use Google's PageSpeed Insights or GTmetrix to measure your current load time. Run a test before making changes, then after each optimization step. This tells you exactly which change had the biggest impact and whether you're heading in the right direction.
Advanced Tips for Hostinger WordPress Sites
Once your basic site is running, you can take advantage of Hostinger's advanced features to save time and improve performance.
Staging Environment
Most Hostinger WordPress plans include a one‑click staging tool. Use it to test theme updates, plugin changes, or new content before pushing them live. This avoids breaking your production site and lets you preview changes in a safe copy.
To create a staging site, go to your hPanel, find the "Staging" section, and click "Create." It copies your entire site — files, database, and settings — into a subdirectory. You can then test freely and push the changes to your live site with one click when ready.
Multisite Network
If you plan to run multiple WordPress sites from a single installation, Hostinger supports WordPress Multisite. Enable it by adding a line to your wp‑config.php file (or through the hPanel advanced settings). This is ideal for managing a blog network or sub‑sites for different language versions.
Keep in mind that Multisite requires careful plugin and theme management — any plugin you activate affects all sites in the network. Test each new plugin thoroughly on a staging copy before activating it network-wide. Hostinger's server resources can handle this well if you choose a plan with sufficient bandwidth and storage.
Email Setup
You can create professional email accounts (e.g., yourname@yoursite.com) directly from the Hostinger control panel under the "Emails" section. Link these to your preferred email client (Outlook, Gmail, etc.) using IMAP settings provided in your hPanel. This builds trust with your audience and avoids the free‑email stigma.
When setting up email, consider creating aliases for common addresses like info@, support@, or contact@ that forward to your primary inbox. This looks professional and ensures you never miss an inquiry, even if someone uses a slightly different email address.
Automated Tasks
Use the Hostinger hPanel's cron job manager to schedule automated tasks like backup scripts or plugin update checks. Many WordPress maintenance plugins require cron access, and Hostinger makes it easy to set up without needing command‑line experience.
For advanced users, you can schedule custom cron jobs for database optimization, cache clearing, or sending scheduled email newsletters. Each cron job can run at intervals as short as every minute or as long as monthly, depending on your needs.
Database Optimization
Over time, your WordPress database accumulates spam comments, post revisions, and transients that slow down queries. Use a plugin like WP-Optimize to clean up these entries monthly. You can also run the optimization from the hPanel's database section using phpMyAdmin.
A clean database improves page load times, especially for sites with hundreds or thousands of posts. Schedule automatic cleanup with a plugin so you don't have to remember to do it manually.
Content Delivery Network (CDN) Configuration
Hostinger includes a free CDN powered by Cloudflare. Enable it from the hPanel under the "Performance" section. This caches your site's static assets (images, CSS, JavaScript) on servers around the world, reducing load times for international visitors.
Once enabled, verify that pages load correctly — sometimes aggressive CDN caching can hide recent changes from visitors. You can clear the CDN cache from the hPanel when deploying updates.
Frequently Asked Questions
How To Install WordPress On Hostinger?
To install WordPress on Hostinger, log into your Hostinger account, access the hPanel, and use the Auto Installer. Follow the on-screen instructions to complete the setup.
Is Hostinger Good For WordPress?
Yes, Hostinger is good for WordPress. It offers excellent performance, affordable pricing, and user-friendly features ideal for WordPress websites.
Does Hostinger Support WordPress Plugins?
Yes, Hostinger supports WordPress plugins. You can easily install and manage plugins through the WordPress dashboard on Hostinger.
How To Migrate WordPress Site To Hostinger?
To migrate your WordPress site to Hostinger, use the Hostinger Migrator plugin or manually transfer files and databases. Follow Hostinger's detailed migration guide for assistance.
Can I use Hostinger for a WordPress Multisite network?
Yes. Hostinger's hPanel supports multisite configurations. You need to enable it via the Advanced settings or by editing your wp‑config.php file. Many users on a budget‑friendly WordPress hosting plan successfully run multisite networks without issues.
Does Hostinger offer free migration for existing WordPress sites?
Hostinger provides the Hostinger Migrator plugin and a free migration service (for most plans) if you request it through their support team. Check your plan benefits inside the hPanel to see if automated migration is included.
What is the difference between Hostinger's shared hosting and WordPress hosting?
Hostinger's shared hosting gives you a general-purpose server environment, while their WordPress hosting includes pre-configured caching, staging tools, and WordPress-specific optimizations. If you're building a WordPress site, the WordPress hosting plan saves you setup time and typically performs better out of the box.
How do I contact Hostinger support if my WordPress site goes down?
Hostinger offers 24/7 live chat from within your hPanel. You can also submit a support ticket for non-urgent issues. Before contacting support, have your site URL, a description of the problem, and any error messages ready — this helps their team resolve your issue faster.
Can I host multiple WordPress sites on one Hostinger account?
Yes, depending on your plan. Entry-level plans cover one website, while higher-tier plans allow multiple sites. You can manage all your sites from a single hPanel dashboard, making it convenient if you run several blogs or client projects. Many site owners combining multiple projects benefit from the best cloud hosting provider features available on Hostinger's advanced plans.
Conclusion
Hostinger makes WordPress hosting simple and affordable. Setting up is quick and easy. The platform offers reliable performance and security. Beginners will find it user-friendly with plenty of support. Advanced users can enjoy more customization options. Overall, Hostinger provides a solid choice for WordPress hosting needs.
Start your website journey with confidence. Happy blogging!
Ready to launch your site? Choose a reliable hosting partner for your WordPress journey.

Similar Posts













[…] is simple with a unique code sent via email. Choose Pawnhoster for a seamless, all-inclusive hosting experience. Launch and manage professional websites with […]
[…] common roadblocks for newcomers. For instance, you can start building your site immediately using a one-click WordPress installation rather than struggling with manual […]